
How to connect WhatsApp Business via Twilio
IMPORTANT - Pre-requisites
To connect and use any WhatsApp Business integration, it's necessary to have your own registered company with valid registration data and documents. Otherwise, WhatsApp will not approve your request and will not allow you to integrate WhatsApp Business with any external platform. If you don't have a registered company, unfortunately it is not possible to connect your WhatsApp Business in JivoChat. Besides that, please note that this integration has extra costs and it's paid separately from the chat license, regardless of the amount of paid agents that you have in JivoChat.
Create your Twilio account and connect it to JivoChat to receive and answer messages sent by your visitors on WhatsApp directly from JivoChat. This integration also allows you to add a WhatsApp communication option in the JivoChat mobile widget so that your visitors can choose to start a conversation with you directly from WhatsApp.
The average time between the first and last step of this integration is from 15 to 25 days. Because of that, we recommend following each step carefully in order to not make mistakes which could cause WhatsApp to not approve your request and delay even longer your integration process.
- Own a JivoChat account
- Create an account on Twilio
- Obtain an approval from WhatsApp
- Purchase a phone number from Twilio
- Activate the Senders feature
- Accept Twilio's request to access your Facebook Business Manager
- Upgrade your Twilio account
- Connect Twilio on JivoChat
- Test the integration and create/use Template and Session Messages
To connect the WhatsApp Business API, please follow the steps below:
2. Create an account on Twilio
If you already have a Twilio account, please proceed to the next step.
To create your Twilio account, please enter Twilio's website and fill in your data. Note: no credit card is necessary for the registration:
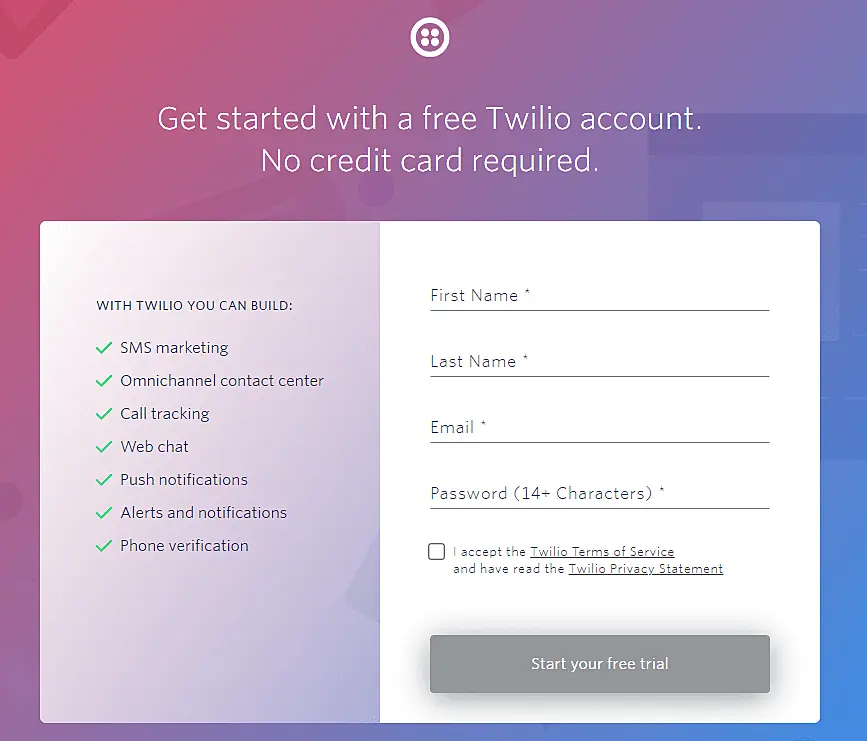
After creating your account, access your Twilio panel and move to the next step.
3. Obtain an approval from WhatsApp
Request to activate your Twilio number for WhatsApp
In order to use Twilio's API for WhatsApp, you must activate Twilio numbers for WhatsApp. Twilio themselves will use this information to confirm your agreement with WhatsApp and comply with Twilio's privacy policies, in addition to helping you with onboarding the integration.
You'll need a Facebook Business Manager ID to start the request for authorizing Twilio to send messages on your behalf. Read more about it here.
To learn more about WhatsApp Business Profiles and Twilio's Sandbox for WhatsApp, please check this documentation here.
Fill in the request form to activate your number on Twilio
Click here and fill in the required data.
Check out our tips below to make sure no mistakes will be made during the process of filling in your data. Any mistakes may cause your integration process to be delayed:
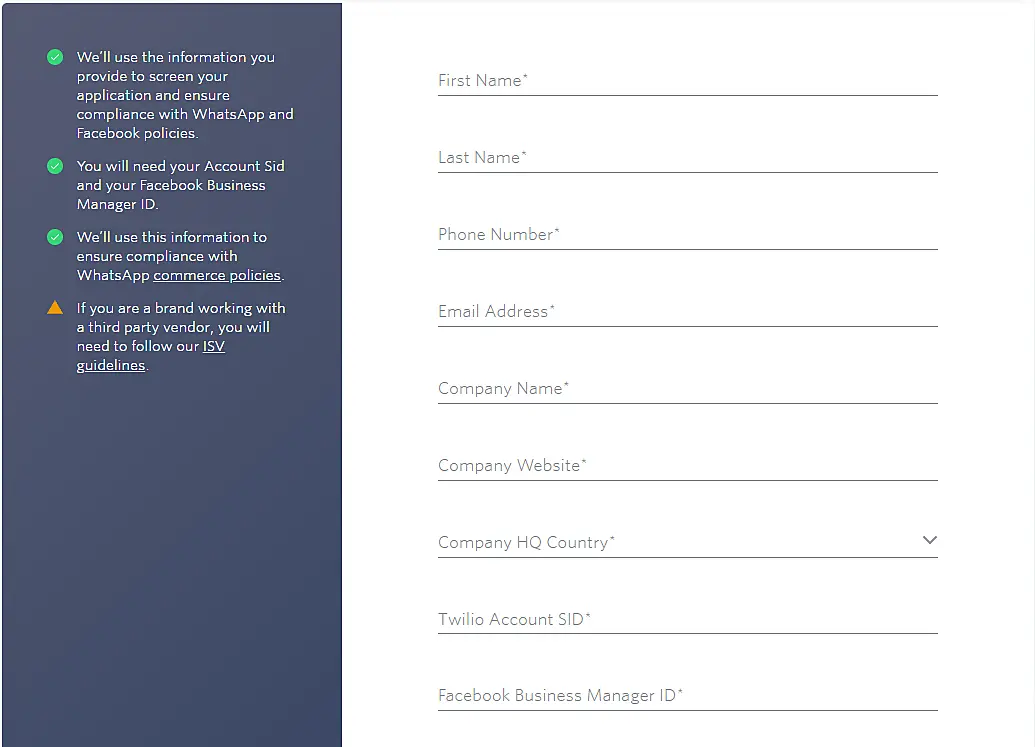
- Phone Number:* insert your contact phone number. It does not necessarily have to be a purchased number from Twilio. We recommend inserting a number that is somehow related to your company to prevent possible step backs;
- Email Address:* insert an existing email address which will also be used by Twilio for contacting you. We recommend inserting an email related to your company;
- Twilio Account SID:* insert your Twilio Account SID. To find your SID, access your Twilio account and go to Settings > General. Your SID will be located in the ACCOUNT SID field;
- Facebook Business Manager ID:* insert your Facebook Business Manager ID which can be found in your Business Manager account at https://business.facebook.com/settings/info?business_id.
For the remaining fields, check our tips below:
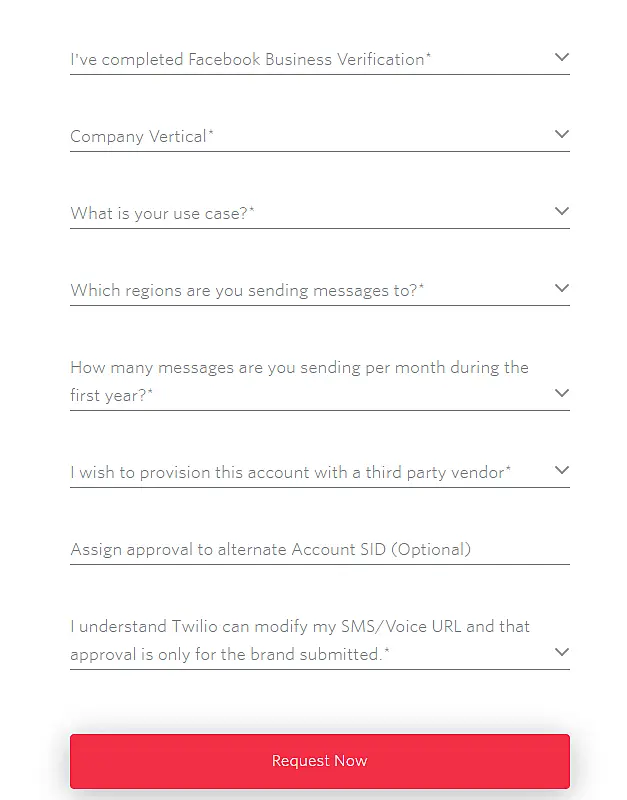
- I've completed the Business Verification:* inform if your business is verified by Facebook or not. Don't worry, it's normal to not have a verified account at this moment. Just make sure to insert the correct information here;
- Company Vertical:* inform your business type. For more information on the business types or if you can't find the correct choice in the list, please check more details here;
- What is your use case?*: inform if you'll use the integration for Customer Support, Notifications, or 2-step verification (2FA or User Verification);
- How many messages are you sending per month during the first year?*: select how many messages on average you believe you'll be sending per month on the first year using the integration via Twilio;
- I wish to provision this account with a third a party vendor:* selecting NO is mandatory in this field if you want to use the Twilio integration on JivoChat;
- Assign approval do alternate Account SID (Optional): inform an alternate Twilio Account SID in case your main account has any restrictions. This field is optional and should be left empty in most cases;
- I understand Twilio can modify my SMS/Voice URL and that approval is only for the brand submitted:* select YES. It is proof that you agree with the agreements proposed by Twilio to activate and use your number for WhatsApp.
After sending your request, if everything is correct, Twilio will contact you in around 5 days with your pre-approval.
4. Purchase a phone number from Twilio
In order to use the integration, you must purchase a number from Twilio to use it as your WhatsApp Business number. Please follow this tutorial here in order to search and purchase a number.
Note : Twilio offers $15.50 (USD) for free to use for testing after creating an account there. This test credit can only be used on test numbers from Twilio. After the approval of your WhatsApp number, you must purchase credits from Twilio to use the integration in JivoChat. Your test credits will be removed after purchasing real credits on Twilio - this is the process of upgrading your Twilio account. Some countries require identity documentation to purchase and comply with the phone number. For requests to purchase phone numbers with these regulations, you will need to add the required documentation after clicking Buy on the console. To see which countries and types of phone numbers are affected by these requirements, please read this article .
5. Activate the Senders feature
Now it's time to set up a sender profile for Template Messages and Session Messages. We'll get into the details of each type of message further down on this tutorial.
Please follow Twilio's tutorial clicking here to learn how to activate the Senders feature and submit your business profile for WhatsApp.
6. Accept Twilio's request to access your Facebook Business Manager
You can only proceed in this step if you were already pre-approved by WhatsApp (step 3 of our tutorial).
After receiving the email from Twilio informing that your pre-approval is processed, please follow this tutorial here to approve Twilio's request to send WhatsApp messages on your behalf.
Next, you must verify your Facebook Business account on your Business Manager. This other tutorial here will show you how to do that. Please notice this process may take around 7-14 business days to be revised by Facebook. Make sure to not commit any mistakes and to fill in only true information, otherwise Facebook will not approve your verification process.
After being approved, in around 5 days you'll receive an email from Facebook confirming that your account is now verified. Inside your Business Manager on the Company Information section, the status will now appear as "Verified".
7. Upgrade your Twilio account
After your WhatsApp Business approval, you'll receive an email from Twilio requesting to upgrade your Twilio account in order to finish the last steps of the integration.
Upgrading your account means to simply purchase credits using a credit card, which also removes any remaining test credits in your account.
Please follow Twilio's tutorial on how to upgrade an account.
Create a WhatsApp Business channel on JivoChat
After the verification and approval process is completed, all you need to do is add a WhatsApp Business channel in your JivoChat account and connect it with your number from Twilio. You'll need 3 simple credentials in order to do that: Twilio SID, Twilio AuthToken and your approved WhatsApp Business number.
Access your JivoChat web app or our Desktop app and go to Manage > Channels > WhatsApp 3rd party providers > Connect

Click to Conect the account to JivoChat on the Twilio column
Fill in the fields with your Twilio account information
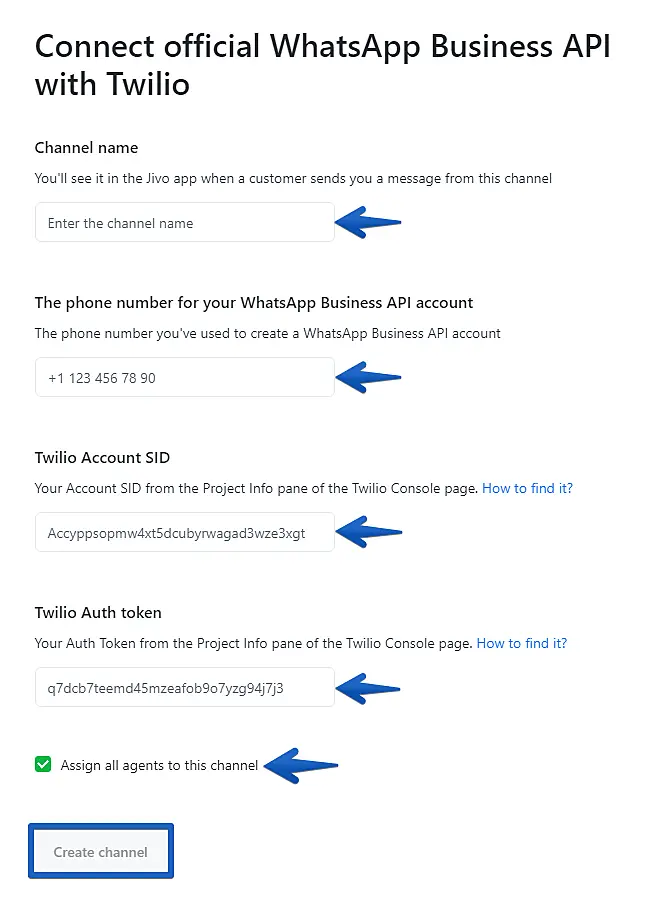
-**Channel name:** The name that will be displayed in the list of connected integrations. Any name will suffice;
-**The phone number for your WhatsApp Business API account:** Your approved WhatsApp Business phone number from Twilio. [Click here to find it](https://www.twilio.com/console/sms/whatsapp/senders);
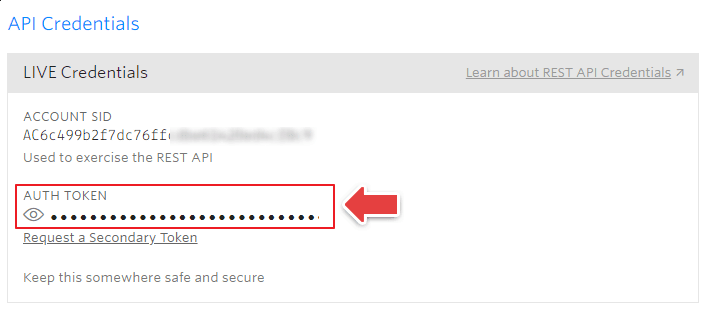
-**Twilio Account SID:** To find your Twilio account SID, [access your Twilio account](https://www.twilio.com/login) and go to Settings > General. Your SID will be located in the **ACCOUNT SID** field;
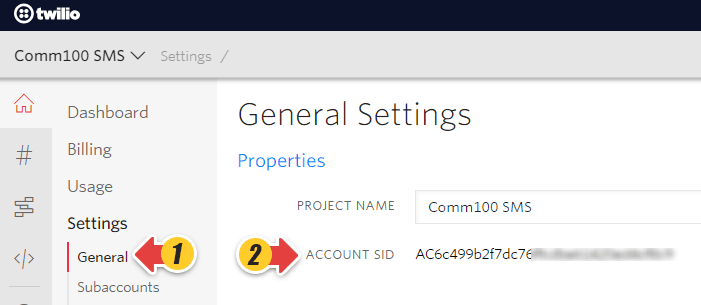
-**Twilio Auth token:** To find your Twilio auth token, [access your Twilio account](https://www.twilio.com/login) and go to Settings > General. Your Token will be located in the **AUTH TOKEN** field;
-**Assign all agents to this channel:** If you checkmark this option, all agents in the account will be assigned to the channel and will be able to receive and answer messages coming from the WhatsApp Business channel. If you uncheck this, only the main admin of the account will be assigned to the channel. You can easily assign/un-assign agents to this channel in the future [following this tutorial here](https://www.jivochat.com/help/users/assign-agents-to-channels.html).
Add your JivoChat Webhook URL on Twilio
-
After creating the channel, you'll be able to find it on the list of existing channels on your JivoChat account at Manage -> Channels, or clicking directly here;
-
Access your WhatsApp Business channel Settings and copy the Webhook URL generated by JivoChat, which will look similarly to this URL below:
https://joint.jivosite.com/xxxxxxxxxxxxxxx/xxxxxxxxxxx -
Paste the generated URL on the field called "A message Comes In" in the allowed senders settings of the WhatsApp section on your Twilio panel at Console > Programmable SMS > Senders > Settings in your number activated for WhatsApp or directly by clicking here, and SAVE the changes.

That's it! Now let's test it.
9. Test the integration and create/use Template and Session Messages
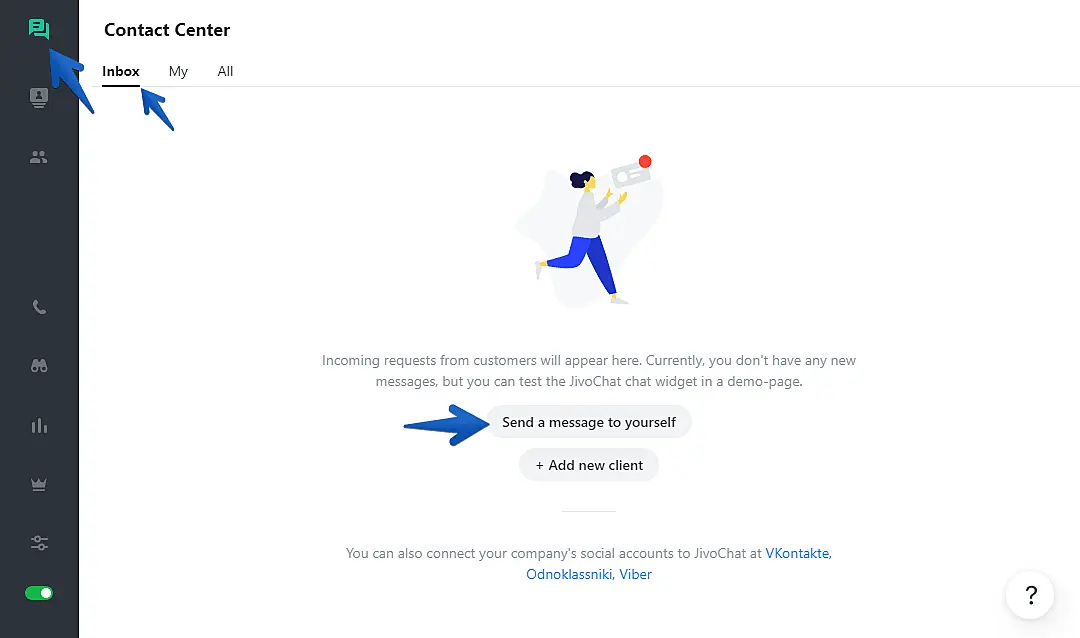
To test your integration, send a message to your WhatsApp Business number connected to JivoChat and verify if your message will arrive in your JivoChat app to the assigned agents. If you're able to receive and answer the message using JivoChat, it means your integration is up and running.
The WhatsApp Business integration offers 2 types of messages: Template Messages and Session Messages. Session Messages are messages sent by your team in response to a client within a 24-hour window after the latest message sent by the client to your WhatsApp Business number. That is, after your client sends a message, your team has 24 hours to answer it sending any kind of message in the conversation. After the 24-hour window, only Template Messages can be sent.
Template Messages are standard models of messages that can be sent via WhatsApp outside the 24-hour window. They can include appointment reminders, shipping information, troubleshooting, and payment updates.
To learn more about Template Messages and how to create them on your Twilio account, please read this article on Twilio's website.
We also strongly recommend verifying the WhatsApp documentation about Template Messages formatting and supported languages clicking here.
Adding a Template Message on JivoChat
First, access your JivoChat web app or one of our Desktop apps and start a chat with yourself, or open any existing chat archive on your account:
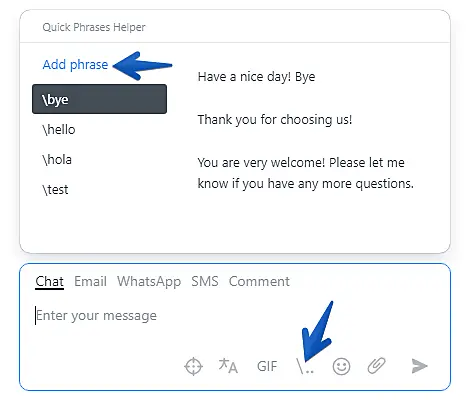
After sending a test message to yourself and accepting the chat as an agent, or after opening any existing chat archive, click the \.. icon inside the chat and then to Add phrase.
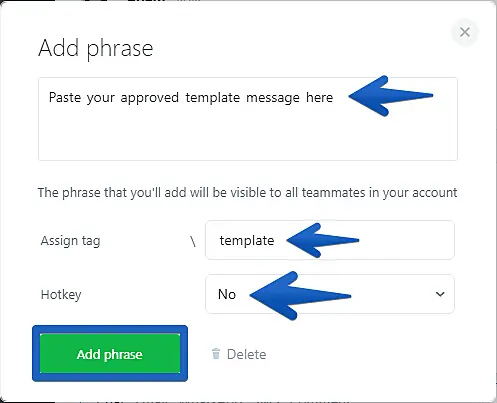
Paste your approved Template Message, exactly as it is on your Twilio panel, choose a tag / to assign it to which can be used later on to quickly find and select a desired Template Message to send in chat, select a quick shortcut (Optional) on your keyboard and click to Add phrase.
Sending a Template Message on JivoChat
During a conversation with a visitor/client, you'll see an input option for WhatsApp in the conversation window. Select it and choose which WhatsApp number will the message be sent from, which contains the approved Template Message that you want to use.

After opening the Quick Phrases window by typing / or \ on your keyboard or by directly clicking the \.. icon, find and click to select which template phrase you want to send in chat. You can also use your keyboard arrows to move through the existing phrases for a faster selection.
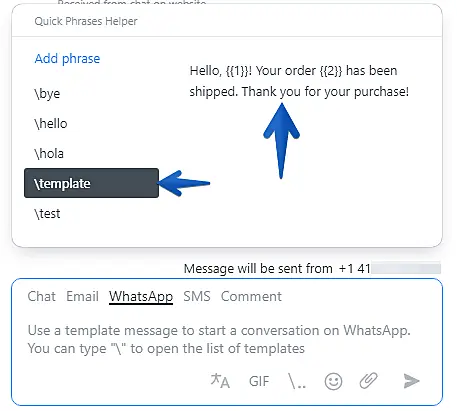
After clicking on a phrase or using your keyboard arrows to select it, they'll show the placeholder variables that you created during your Template Message approval on Twilio. Replace the placeholders with the desired information and send it to your client.

That's it! Please note that Template Messages can only be sent if they were already approved by WhatsApp.
Now you're ready to answer your WhatsApp Business clients directly from your JivoChat apps.
We hope this article was useful and we wish you a very productive day!
FAQ:
I don't own a company. May I use the WhatsApp integration?
Unfortunately, no. This feature is available only for registered companies. This is a demand by Facebook.
I'm a one-person business. May I use the WhatsApp integration?
If you own any registered company, you are allowed to connect this integration. There might be some step backs but Twilio's support team can assist you with any difficulties you may have during the approval process.
I did everything as oriented but my company or WhatsApp Business account was not approved by Facebook. What should I do?
If your documentation is correct, your company has a regular registration, and there are no discrepancies between the information on your Facebook Business Profile and your company's registration, it is unlikely for this to happen. Our team and Twilio's support team will be available to help if you find any difficulties.
Please check here to confirm if your business type fits Facebook's criteria for using the WhatsApp Business API.
Is it possible to undo the integration if I want to go back to using WhatsApp normally?
This is very important: NO. After activating the WhatsApp Business API on your phone number, you'll no longer be able to use it on a regular WhatsApp app (mobile or web apps), only via the API (integration). This rule was created by Facebook themselves.
Is JivoChat an official Facebook/WhatsApp channel?
We work in direct partnership with Facebook and also with official WhatsApp Business API providers from all over the world.
How can I get a verified business badge on WhatsApp?
WhatsApp does not define a clear process for including a verified business badge on their platform. That is, there is currently no exact process to do this. Check more details about it here.
Are there extra costs to use the WhatsApp integration in JivoChat?
Yes, there are extra costs for using this integration, regardless of the number of paid agents in your JivoChat account.
The extra cost is caused by the charges made by WhatsApp themselves for the usage of their API by official partners.Click here for more details on the prices charged by Twilio.
The payments are made directly to our partners (Twilio, MFMS, or others). At the moment, we offer this integration through 2 different partners who offers different contract models: Pay-as-you-go per message via Twilio or Pay per package of messages via MFMS.
Do I have to purchase a new number or can I use my existing number?
On Twilio, you must purchase a new number directly through their platform. It can be possible to connect existing approved numbers but the process can be much harder to complete. We recommend contacting Twilio's support team for help with this.
Can I transfer my approved WhatsApp number to Twilio?
In some cases, it's possible to move an already approved WhatsApp number to Twilio.
If you subscribed to WhatsApp using the default WhatsApp app or WhatsApp Business app for small businesses, it can be possible to use the same number on Twilio. We recommend contacting Twilio's support team for help with this.
However, if you subscribed to WhatsApp using the WhatsApp Business API outside Twilio directly through another official WhatsApp API provider, you cannot move the existing WhatsApp Business number to Twilio. This is due to the current limitations on transferring numbers and properties to existing business accounts.
Unfortunately, not all countries are supported for this migration at the moment. To verify if your number can be moved to Twilio, please contact Twilio's sales team here.
Is it possible to test the integration with WhatsApp before using it?
Yes, it is possible to test the integration even before purchasing a number. You are able to receive and send WhatsApp messages through JivoChat using the test number offered by Twilio on their test environment (Sandbox).
What is the difference between Template Messages and Session Messages?
Session Messages are messages sent by your team in response to a client within a 24-hour window after the latest message sent by the client to your WhatsApp Business number. That is, after your client sends a message, your team has 24 hours to answer it sending any kind of message in the conversation. After the 24-hour window, only Template Messages can be sent.
Template Messages are standard models of messages that can be sent via WhatsApp outside the 24-hour window. They can include appointment reminders, shipping information, troubleshooting, and payment updates. Read more about Template Messages clicking here.
How does the 24-hour rule for answering clients work? How to send messages to clients through the API after the 24-hour window?
This happens due to WhatsApp policies. This policy forbids answering messages received over 24 hours ago through external applications. If you wish to continue a conversation after this period, you must send an approved Template Message or wait until your client get in touch with you again.

